Labels

Showing posts with label Organization. Show all posts

Tuesday, January 21, 2014

Time Stays Long Enough For Those Who Use It

Hi there and happy snow day(s) to you all!

I bring to you an organization and planning tip from a first grade team at one of the schools where I work. They have every day mapped out corresponding with their language arts curriculum. The teacher's manual already gives a scope and outline of what pages are where but typing them out in the order you want to teach it will save you a lot of instructional time in the end. Having the lessons typed out has helped me as the building sub, if I have to come in and cover in the middle of language arts. It is also a great thing to have prepared and on your desk with your materials if you have an unplanned absence. The plans will be very easy for a substitute to follow without any major preparations.


Wednesday, January 15, 2014

Online Class Organization


I've started going back to school for my masters back in August. This semester I will be taking an online class. There is no face to face interaction and all components are online. There will be a lot of readings and assignments and organization is key. If you are taking an online class now or in the near future keep reading for my tips to stay organized!

1. Get your materials ready!


Even though a class is online and all the documents I need are available online, I still like to have physical copies. I need to bring the classroom to me! This way no matter where I am, school, home, the gym, waiting room at the dentist, I have everything I need to get my tasks done. I like having the papers in my hand to mark up and highlight.


I set up a binder, printed out my syllabus and put each page in plastic page protectors. At the end of most semesters my syllabus is completely torn up and scribbled all over. I put the syllabus in the page protectors so I can write on the protectors with a dry erase marker. I think that will help keep me sane.

Yes, you're eyes are correct, that is a good old fashion pencil case! It holds a highlighter, pen, dry erase marker, and some post it notes.


2. Get your computer ready!


Aside from organizing the binder, I have also gone ahead and organized my computer for this class.


I have a folder in my documents designated to my class for the semester. In that folder are MORE folders. Each folder is labeled by a week in the course. I downloaded and put all of the required readings due for each week in their own folder. This will make it easier through out the course and save time each week searching for what I need to be reading.

3. Refer to your syllabus and portal often!

It can be very easy to forget what you have going on in an online class when you do not need to physically show up anywhere. Stay organized and on top of your online assignments. Time will slip away from you. Check whichever portal your school is using to facilitate your online class often! You may not always get email updates when something has been posted. You do not want to miss any important information!!! I like to make sure to check mine in the morning and in the evenings.

If you are taking 1, 2, or more classes on top of an already hectic teaching schedule, I salute you! It isn't easy but with proper time management and organization it can be done! Good luck to all starting their January classes!

Sunday, October 20, 2013

Slow Cooker Sunday

Being on a substitute teacher's income with a long commute home, I am always looking for ways to save time and money. Creating make ahead slow cooker meals seemed like a way to achieve both goals.

I started by browsing through Pinterest. There are a ton of great blogs dedicated to slow cooker meals and how to properly prep and freeze them.


I compiled my recipes from different blogs and sites. I tried to have them include a few of the same ingredients so I wasn't buying TOO many things at the store. I knew they would all include some sort of meat. Pay attention to your local grocery store's sales. Today, I was able to mix and match 5 different kinds of meats and cuts for $19.95. What a deal!

After printing out my recipes, I compiled my grocery list.


I found it easier to break the ingredients up by type. Meats, Cans, Seasoning/Sauces, and Produce. It made life simpler when I was going through the grocery store isles. I wrote down everything I would need and then went in my kitchen first and crossed off what I already had.  And yes, I did bring that clipboard with me into the store to shop (recipes on the bottom, lists on top).

I bought good quality gallon size freezer bags as well as Reynolds Wrap Slow Cooker Liners. The liners save a lot of clean up time, especially if you are going to be using your crock pot several times throughout the week.

When I got home, I laid all of my ingredients out on the table which became my work station.


**Get out all of your freezer bags and label them along with the required cook times before you start filling the bags. **

For me, it was easier to work on one recipe at a time. Once each bag was filled I squeezed all the air out of the bag and laid it flat in the freezer. 

When the bags are completely frozen you can stand them up and file them if that gives you more room in your freezer.


It only took 2 hours to prep and make my freezer meals. I was able to make seven meals for $86. That comes to about $12 per meal. Each meal has at least 4 servings. Each serving is about $3. Where can you get a wholesome and healthy plate of food for $3.00?!

I can't wait come home after a long day at school and have these meals already prepped and cooked. It will make Slow Cooker Sunday totally worth it.


Thursday, October 17, 2013

How to Survive a Long Commute

My new commute to work this year runs me about 45 minutes on a good day. With that chunk of time stolen from my day, I need to be as efficient as possible in the morning. I save some tasks for the drive and have in place things to look forward to.


Grab Your Cup of Joe

I purchased a couple of Aladdin travel mugs from Target. Make sure they will fit in your cup holders.

Aladdin Recycle & Recyclable Travel Mug - Green (16oz.)
Buy Here


I bought them in the same brand and style so that I wouldn't have to fish around everyday for the right lid. They all fit, no matter the color. I brew my coffee at home and drink it in the car. It will save you so much money to make your coffee at home. If you can't get away from drinking your Starbucks, give yourself one day a week to pick up coffee on the way. Choose a day you are the most miserable for a good pick-me-up.

I also bring a straw with me in my travel mug. I can sip as I drive without having to lift the mug up and risk a coffee spill if I go over a bump in the road.

Breakfast on the Go

I cannot say it enough, I do not want to waste my precious sleeping time to sit and watch the sun rise while I eat breakfast. I eat my breakfast in the car. I usually make myself some type of breakfast wrap or a breakfast sandwich. See my breakfast sandwich post here!

Proper Listening Material

Find some talk radio in the morning that you enjoy. It makes the drive go by faster, I promise. In the morning, I listen to...


On my way home from work I really like listening to podcasts. You can find and download podcasts about virtually ANYTHING. My personal favorite is Stuff You Should Know. I figure I have 45 minutes every day, I might as well get smarter while I drive! I have learned about Miranda Rights, how police sketches work, myths about the brain and more!


.

Overall, don't try to think about how long your commute is. No matter how much you think about it, it's still going to be a long. Try to use it as your time to reflect and relax.

[source]
                                           

Thursday, July 18, 2013

My Favorite App: Do!


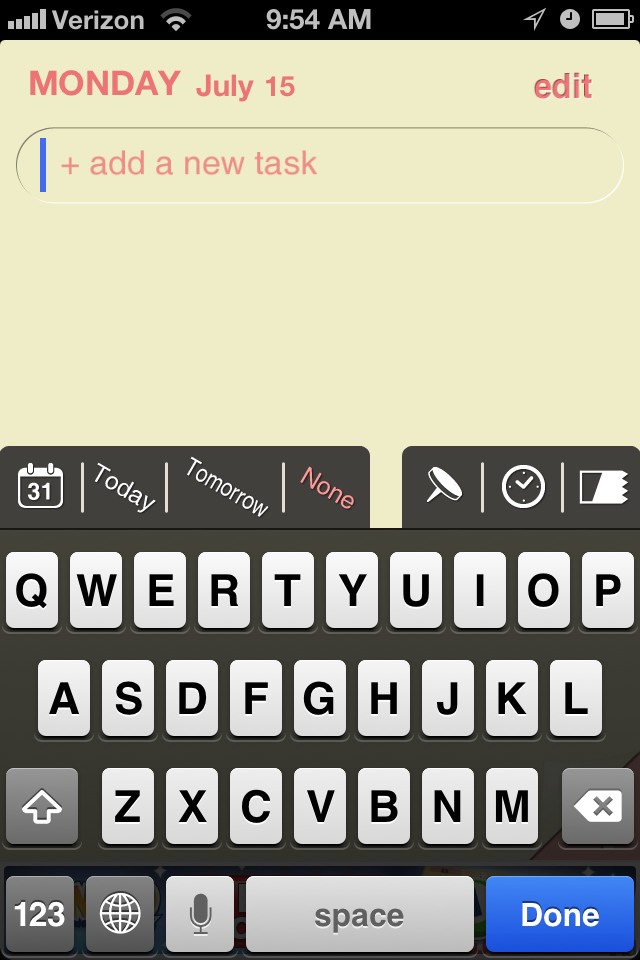
I love lists. I have note pads everywhere, on my fridge, on my night stand, and in my phone. I keep several different running lists on the Notes app on my ipone. I keep a wish list, you know, in case someone hands me a bunch of money and I have no clue what to spend it on. I have a "Apartment Wants & Needs" list, "Projects I want to do" list and the list goes on and on. I use the Do! app for my lists of things I need to accomplish in my day to day life.

The app is free by the way and cute! Do! really lets you personalize. Below are some screen shots of what you can Do! (hah) with this app.


I love being able to flag each item with different colored digital tape!


 You can even set an alarm to remind you of certain tasks.

 This is my horrible attempt at showing you that you can slide items up or down. After you have made your lists you may want to change the order, this app lets you do that.


Below is what it will look like when you are searching your app store. While I was looking for the app to show you the screen I also came across a new version of the app! I downloaded it and it seems pretty much the same expect the digital tape looks more like washi tape. It's so stinking cute I could have squealed when I found it. 

I should probably state that Do! has no idea who I am. I am just a huge fan of cute and organized.


Wednesday, July 3, 2013

Moving Day Recap!


The boxes have been moved, mirrors have been hung, and the aches and pains in my legs are finally gone. We've moved into our apartment. It went so smoothly. A lot of it had to do with the tips I posted here. Preparing for a move and actually moving are two separate things. Here are some things that helped me on moving day that wasn't in the previous "moving tips" post

1. If your friends are helping have them come in shifts. This may work out without you having to really schedule anything due to people having lives and all. I had a lot of help in the morning with getting boxes up to the third floor (no elevator here ladies and gentlemen!). I had three friends plus me to do this. With their help and three cars, we had all boxes in the apartment by noon (we started bringing boxes in around 9:45-10ish, not bad eh?!). We rented a UHaul and Dave (boyfriend) and his brother filled it with all the furniture and were responsible for bringing Uhaul contents up to the apartment. The reason why I didn't just have all boxes and furniture in the Uhaul together was that I thought it would become a bottle neck and slow the process down. I could just imagine everyone grabbing things from the Uhaul while furniture was trying to be brought it. It seemed crazy to me. Most of the boxes were moved into the new place while the furniture was being loaded into the truck from our old place and a storage unit I had holding a lot of my furniture. By the time we were done with the boxes, the Uhaul was at the apartment ready to unload. We never really crossed paths and weren't in each other's way.
      My mom came half way through the move, she was especially helpful in placing the furniture in places that made sense. Having someone come in with fresh eyes and who isn't exhausted from moving for four hours already will help keep moral up. She was probably an HGTV star in a previous life so she came in and sprinkled her magic design dust.

That's her doing her "leveling" work
2. FEED THEM

Find a pizza place and order pizzas for everyone. I made sure to buy a case of waters too. The last thing you need is a dehydrated friend passing out on you. We ended up with too much pizza but I would have rather that scenario than people being left hungry and being put to work. We were able to give Dave's dad an entire pizza to take home with him. Consider buying some gift cards ahead of time to hand out to people you have asked to help as an added thank you. Another idea would be to pay for their meal the next time you are out with them.

3. Do some prep work at the apartment the night before, if you can.

We signed our lease on a Friday after work and prepped to move Saturday morning. After we signed the lease, I filled the apartment with some necessities. Toilet paper, paper towels, trash bags, paper plates, advil, band-aids. I also brought in bags that I had prepped the week of. 
-  a bathroom cleaning supply bag (don't forget the plunger) with a shower curtain and liner
-  a kitchen cleaning supply bag
-  a bag of command hooks, scissors, extension cords, surge protectors, box cutter

This helped save me an errand in the morning knowing all of this stuff was already in the apartment and placed in appropriate spots. 

4. Stay calm. 

Don't stress especially if you have friends helping you. At the end of the day, you want them to still be your friends. Things may not go the way you planned and their may be kinks but just keep your eyes on the final result.


Light bulb problems...not the worst thing in the world.


Saturday, June 22, 2013

Bargain Hunting 101

I will be moving into my new apartment in less than one week. I have been out of college and in the working world for a little over a year now. For now, I am a substitute teacher, which may come as a shock but it doesn't exactly bring in the big bucks (sense my sarcasm?). I have to be really smart with my money and try to stretch it as far as it can. Having to fill an empty apartment is a task on it's own but doing it on a tight (emphasis on "tight") budget can be a whole other ballgame. I was actually really excited and up for the challenge.

I have been doing some bargain hunting the last month and I wanted to share some tips and steps for successful bargain hunting.

1. Decide what you need!

Do not, I repeat, do not just wander into yard sales without some vague sense of a plan. You will end up buying things you will not need or use.

This a picture of the kitchen in the model unit of the apartment we will be moving into.

The kitchen itself is very spacious, which I love! But there is a lack of storage and drawers so I knew I was going to need some sort of baker's rack or dresser I could spruce up for some extra storage. I would place it where you see that lovely pink oval.

I began looking at my normal spots, Target and Wal-mart.

 Target had baker's racks for about $150


Even their kitchen carts were over $170.


While this kitchen cart fit my kitchen needs perfectly it did not fit my wallet needs. I knew I needed a solution to my kitchen problem but I wasn't willing to shell out $150. This is where I decided what I was going to need, but with a better price tag.

2. Start your hunting....and be patient

There are many resources to find cheap furniture.

- Yard Sales
- Habitat for Humanity ReStore
- Goodwill
- Salvation Army
- local thrift shops
- Craiglist
- and always family or friends :)

I went to many yard sales and walked away empty handed and that's OKAY. Just because you are searching for someone's used goods doesn't mean you have to settle.

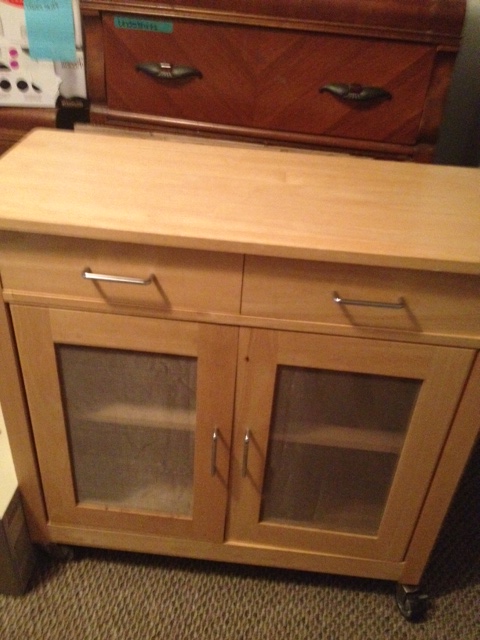
I finally found my kitchen cart on craigslist. I know craigslist can be a little sketchy at times. So no matter what you do, always go to pick up your item with a friend. Don't go alone - that's just silly.


This was the magical ad that helped solve all of my kitchen storage problems. I emailed back and forth with the seller and then went this morning to pick it up with my boyfriend, Dave. Your eyes are not deceiving you, the cart was priced at $20. The family I bought this from had recently redone their kitchen and had no use for this great conditioned kitchen cart. I am happy to be the proud owner of it.


I am still looking for a cute and dainty desk. I have been searching around and have not had much luck. I am stubborn and am not going to spend over $75 on a desk so I am going to continue bargain hunting until I find one. I am okay using my old foldable desk in our apartment until I find one. Decorating and filling an apartment or house is a process. Don't lose hope if it is not all done at once, you'll get to the place you want to be!

What are some of your greatest bargain finds?


Monday, June 17, 2013

Moving Tips


As mentioned in a previous post my boyfriend and I move in t-minus two weeks. We found our apartment two weeks ago so I will have had four weeks total to prep, pack and move. I have done a lot of research to find the best moving tips to make our transition as easy and stress free as possible.

Tip #1: Purge

Grab some trash bags and try to get rid of as much as possible. You want to start with a fresh start when you move into your new place. You also do not want to waste time moving junk! Moving day is going to be a lot of work, don't make it harder on yourself. If you can, donate the items that others can put to good use. I currently live on a busy street. On several occasions I have put a piece of furniture at the end of the driveway and within hours someone has already driven by and taken it. I am always so appreciative of the good finds I find while thrifting so because of that, I try to pay it forward and donate as much as I can.

Tip #2: Make a Traveling Moving Head Quarters


Put all of your packing supplies in one place that you can tote with you as you pack. It seriously is the best tip I found (I tried to find the original source with this brilliant idea but I couldn't find it!). I made sure to put packing tape, duct tape, scissors, labels, and sharpies in my basket. Make this even easier and get retractable sharpies so you do not have to worry about finding the cap.


Tip #3: Create a Key

I saw this advice on a lot of blogs. Make yourself a moving key.


Then place the matching colored labels on every box and piece of furniture you are having moved. It will save everyone so much time. No one will have to wait for you to ask "Where do you want me to put this?" I made two identical signs. One will be placed in the moving truck and another at the entrance of the apartment. I know this may seem like a redundant task if I am already labeling boxes with where to place the boxes but many items are not in boxes and I cannot easily place duct tape on them to label them (I fear the adhesive may not come off nicely). The colored stickers should help with that. 

Tip #4: TAKE THE TIME TO LABEL YOUR BOXES

Do not simply write "Kitchen" on your box. That is the location of where you want your box placed. Somewhere else on the box you need to make a list of everything that is in that box. This way, if you need to unpack slowly you can pick and choose high priority boxes to unpack first depending on what you need.


Sunday, May 5, 2013

Sub Tracker

Come on over to my Teachers Pay Teacher's store and grab yourself a free Sub Tracker.

It's important to keep track of your sub jobs including special tidbits about each one. Soon it will get hard to keep track of all of them and if you want to return or not. Print a chart for each district you sub for and update as you go.

Headings:
- Date
- School
- Grade
- Teacher
- Plans
- Class Behavior
- Parking Notes
- Notes
- Return Again?

Give yourself good reminders such as:
- to park continue down the street and turn left (this will save you time in the morning)
- No cell reception in case of emergency

Saturday, May 4, 2013

Time Saver

I have been in many kindergarten classrooms where the students write in journals (writer's workshop, kid writing....). It becomes a mad dash for the teacher to write the dates on all of their journal pages and then begin checking and assessing their work.

I subbed in a kindergarten classroom with one smart cookie for a teacher.

See that stamp? The one with the date!? Ground breaking! Seriously such a time save! The teacher can simply walk around the room and stamp, stamp, stamp!

You can find a stamp similar here.


Thursday, May 2, 2013

Unplug with Ease


I don't know about you but I cringe every time I unplug my laptop and the cord falls and hits the ground. Even after I lay the cords on my desk they inevitably fall. I found my solution at the Target Dollar Spot. I bought a Plug Out for $3. It has a sticky back that you peel off and you can stick anywhere to keep your cords in place. You can also buy them here, you will get a set of two for $8.49. I just may need to buy more!


*Plug out has no idea who I am. I just wanted to share a great product.


Wednesday, April 24, 2013

A Glimpse in a Kindergarten Classroom

After being in many different classrooms this year, I have noticed that some of the most organized classrooms are those of kindergarten teachers. This is probably because they usually have an AM class and a PM class. Being organized is especially crucial. They have two sets of many things. Kindergarten classrooms also tend to have more STUFF....dramatic play centers, science centers, blocks, listening centers, math manipulatives, and pocket charts, pocket charts, and more pocket charts.

I had the privileged of being in a kindergarten teacher's class that had organization, function, and classroom design DOWN. I could see that most of the items in her classroom were purchased at a local Lakeshore Learning store (www.lakeshorelearning.com). I have real life classroom pictures plus links to the products. 

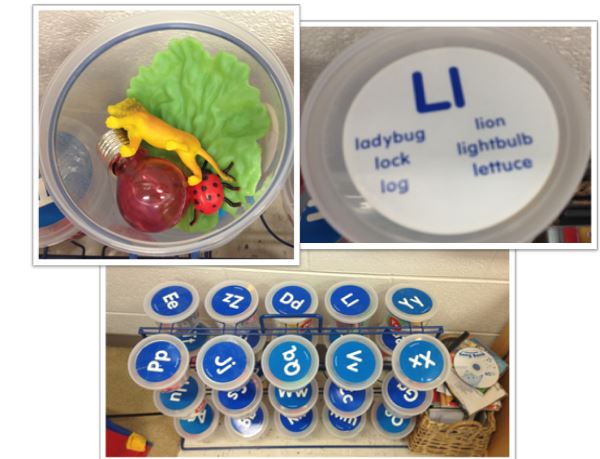
 Alphabet Sounds Teaching Tubs


Find this product here
I think a DIY alternative is definitely possible. It will take a lot of time but probably won't cost you $150. The storage rack is $29.99

Creating Centers


On the side of the filing cabinet are the list of different centers students can participate in. On each side are little magnet people (AM class on one side and PM on the other). Each magnet person has a students name on it. You can easily group your students and your students can easily see what group they belong in and where they need to be. You can simply rotate the centers by moving the yellow center magnets and then tell your students to move to the center next to their name. 

The paper trays in the picture house some of the different centers that involve coloring, writing, reading, and well..paper. These can be found here on Lakeshore's website. A set of 4 is $19.99

Write & Wipe Kid Magnets can be found here.
30 pieces for $19.99

The magnetic center chart is also another project that can be turned into a DIY. 


 Magnetic Place Value Blocks

How long have these existed without my knowledge?!! I don't know how many times I have come into a class having to teach place value. I end up holding and DROPPING the little cubes and fumbling through the lesson. Just add magnets to the back and BOOM, easy! It will make any lesson more effective when your students can actually see what you are talking about. 

Magnetic Place Value Blocks can be found here
121 pieces for $44.99

Teacher on a budget version: Add magnets to your blocks. :)


Organize Your Materials By Day

I mentioned a similar concept in a previous post. Organizing your materials by day will help keep you the classroom teacher organized from day to day but it will also help your sub. 


Similar bins can be found here
6 for $39.99

There are so many great teaching resources out there. When on a budget try to balance what is worth buying to enhance your classroom and what you can make on your own.